WATCH VIDEO: Virtual Laboratory for Robotics
WATCH VIDEO: Virtual Laboratory for Hydraulic Control Systems
The idea of distance learning and e-learning has been growing fast during the last two decades with the rapid grow of Internet and communication technologies. It started with e-books and e-correspondence, then teleconferencing, while the current status involves the full “virtual university” and that makes a serious business. What is important to notice is a discrepancy between the grown practice in “narrative” disciplines, like Management or Economy, and the underdeveloped state in technical fields. Perhaps this situation follows from the fact that the development of distance- and e-learning has been considered mainly the matter of IT experts, i.e. the matter of communication, programming, data-basis, AI, and related. Technical fields, like Mechanical Engineering and Electrical engineering, need laboratory exercises. These exercises mean physical experiments with real equipment. To allow the full e-learning, one need “virtual laboratories” – software system that will emulate the real process and the physical equipment, featuring all relevant effects. The core of a virtual laboratory is the mathematical model of system dynamics. It allows calculation of all the variables that would be normally measured in a real laboratory. Therefore, the expertise in the particular technical field is needed. Since this has been out of the scope of interest and knowledge of IT experts, technical fields are included in existing e-learning and distance learning systems to a rather limited degree.
Our idea is to improve the state in a typical technical discipline, Mechatronics, being the fusion of Mechanical and Electrical Engineering. Since this is a rather wide field, we chose probably the best example representing the problems of Mechatronics – we discuss Robotics. We present the Virtual Laboratory for Robotics (VLR). Robotics integrates the knowledge from: mechanics and mechanical constructions, actuators, sensors, electronic hardware, and control algorithms and their software realization. Note that the role of a virtual laboratory is in fact twofold: one role is to replace physical laboratory, thus allowing distance learning; and the other is to be the first step in a regular teaching process, preparing students for the real laboratory.
There are two aspects of the problem concerning the interaction (communication) of the user and the system:
Standard features. The first aspect comes out from the request that a user/operator should communicate with the simulator as if he was in front of a real robot. This means that the simulator “command panel” should be designed to emulate the real one. In this way, the user introduces the forward information (actions) to the robot (like teaching and programming) and receives the returned information (monitoring the positions and other variables). This mode is necessary to allow a realistic training of robot operators.
Advanced features. The second aspect exploits some advantages of the simulator over the real system. With the virtual robot almost all parameters may be modified, which cannot be done with the real system. For example: we may overload the robot; it will move down collapsing until hits the ground; then we change the motors with stronger ones by simply introducing new catalogue parameters; the robot will raise and continue to work properly. Here are some more examples. If the robot arm oscillates or features a too large tracking error, we may change the feedback gains until achieving the proper behavior. In the case of unacceptable static error, one may apply feedforward control compensating the gravity load. In applications where collision with the environment is possible, compliance in torque transmission may be introduced.
To efficiently change the parameters, a user-friendly interface is needed. Note that the system is intended for education and an inexperienced user might under- or over-estimate parameters and thus prescribe the values which are rather far from reality. Therefore, the interface has to provide the guidelines for selection of parameters and the testing of the selected values. For instance, the mechanical efficiency of a gearbox will be tested against its physical lower and upper limits: (more narrow margins might be defined). However, testing other parameters, like motor torque constant or control-voltage limits, requires a more knowledge-based approach.
The window intended for changing parameters is shown in next figure:
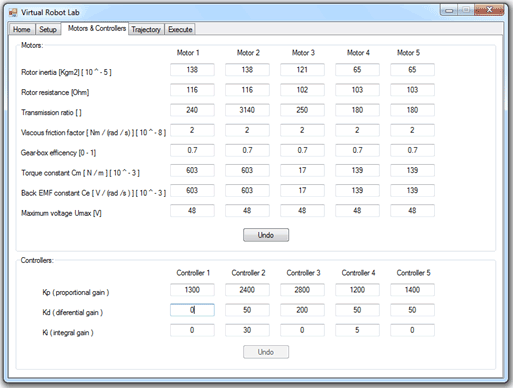
Drive & Controller parameters
In addition to parameters, one may change the control scheme. Besides changing the parameters of the predefined PID scheme, this includes a possibility to define a “custom block” in the control scheme. Programming this block the user will define his own control and check the results.
The advanced features highlight the possibility of using the simulator for experiments and exercises not just for future robot operators but even more for students learning the robot theory.
Next picture shows several possibilities to define robot trajectory (in global/external or internal coordinates). Transition between points of interests can be required with point-to-point or trapeze velocity profile mode. Effects of feedforward voltages can be modify in this window:
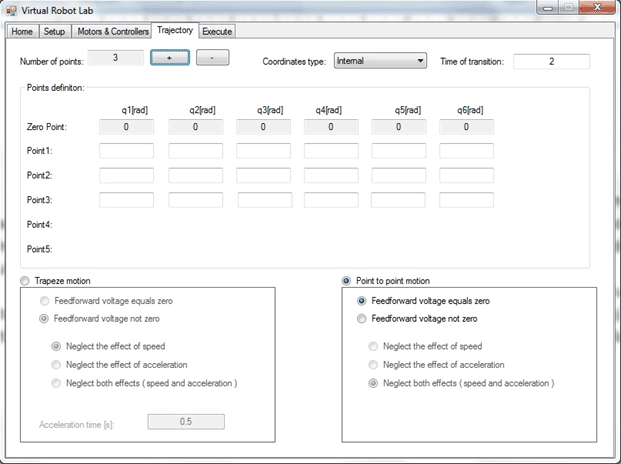
Trajectory parameters
Visualization. The crucial potential disadvantage of a virtual robot comes out from the fact that the device does not physically exist and therefore is not present. To overcome this, we need a sophisticated animation. Although diagrams that show time histories of relevant variables represent an efficient way to monitor the system behavior, animation is still necessary to complete the impression. The detailed image will move according to the mathematical model, replacing the real robot. Let us impose some standard requests to animation.
- Robot image must be detailed;
- Different viewpoints (camera positions) are necessary (including the camera mounted on the robot gripper);
- Different lightning is desired;
- Visualization includes the robot environment
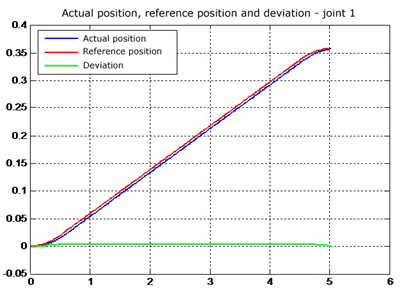
Next figures show some diagrams (time histories) intended to monitor and evaluate the system behavior. They are recorded for the first joint of a jointed-scheme robot – rotation about the vertical axis. The first one presents the joint coordinate: reference, actual value, and deviation. Note that trapezoidal velocity profile was required (short acceleration, then a period of uniform motion, and finally deceleration). The second picture presents the joint velocity. The third shows the input control voltage. The control scheme involved the feedforward based on a simplified model (centrifugal and Coriolis’ effects neglected) plus the PID feedback. Next picture shows how the feedback voltage is distributed to P, I, and D gain. Finally, the fifth presents the motor current.
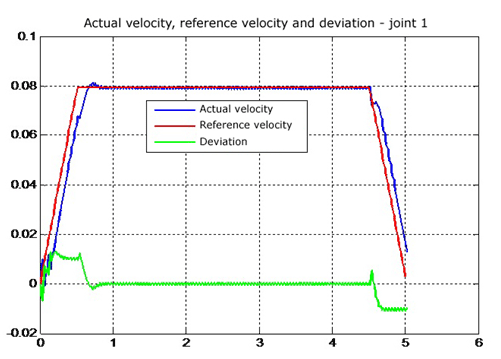
Joint velocity
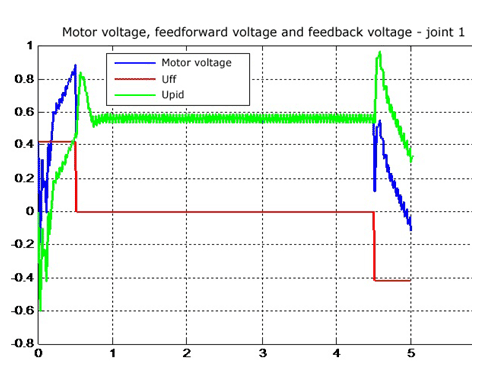
Control voltages – feedback + feedforward
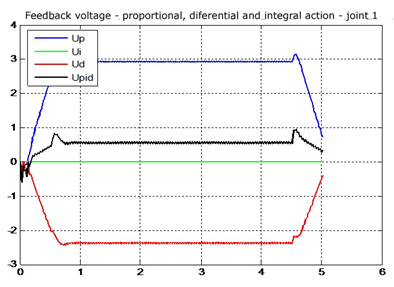
Feedback voltage components – proportional, differential, integral
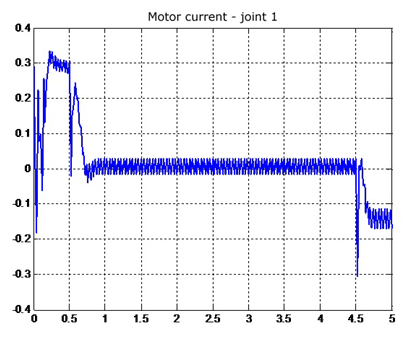
Motor current
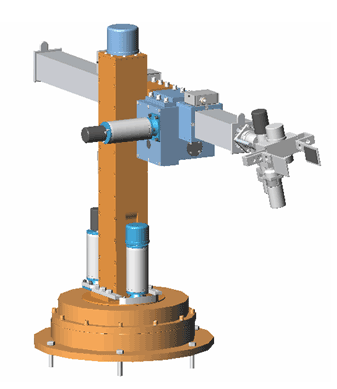
Next figures present the visualization, external view of the two of several robots used in VLR at ETF, but also the gripper from the different point of view as the advanced features of use of the several cameras (one image is taken from the camera mounted on the robot gripper and the second image is taken from a camera moving with gripper but always being next to it looking at it from a given distance.
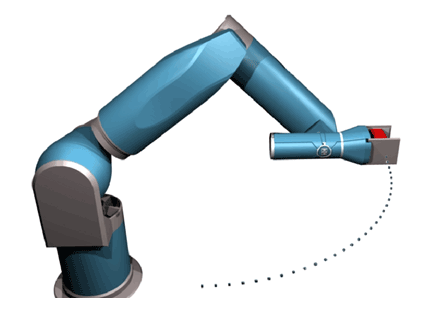
Jointed configuration robot
Cylindrical configuration robot
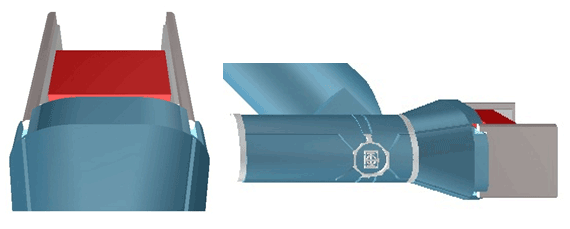
The views taken from the camera mounted on the robot gripper, and from the camera “flying” next to the gripper
Let us now introduce some additional requests – some advanced options making advantages of the virtual robot over the real device.
- The robot moves leaving a trace behind it. The trace may be a line – showing the trajectory of the tip point (as shown in picture of the Jointed configuration robot). In the other case the trace may refer to the whole gripper or the entire robot arm (like a “ghost effect”). The trace may stay permanently to show the entire motion or temporary (deleted with some delay).
- An important feature of the virtual robot is that its graphics includes all the inner mechanisms. We have in mind the transmission systems (gears in a gearbox, belt, rack and gear, spindle, etc.), motor elements (stator with magnets, rotor), encoder inner structure, etc. All these inner mechanisms move in full accordance with the kinematic and dynamic model. The user can “open” the robot arm – remove the cover to expose its internal. So, a student or a trainee can examine the behavior and the role of each robot inner element. Following pictures presents the drive and the transmission mechanisms used to move the elbow of the Jointed configuration robot (note that all these elements are placed inside the upperarm segment), the next one shows the full drive: motor, single-stage gearbox, a pair of bevel gears to change the direction, and the belt to transport the motion at distance. The next shows the same drive but with a 3-stage gearbox; on left side the motor is “closed” while on the left side the motor is “opened” revealing its inner structure. The last picture presents the drive used to move the shoulder joint. It is opened and one can see the magnets on the stator, the rotor armature, and the encoder.
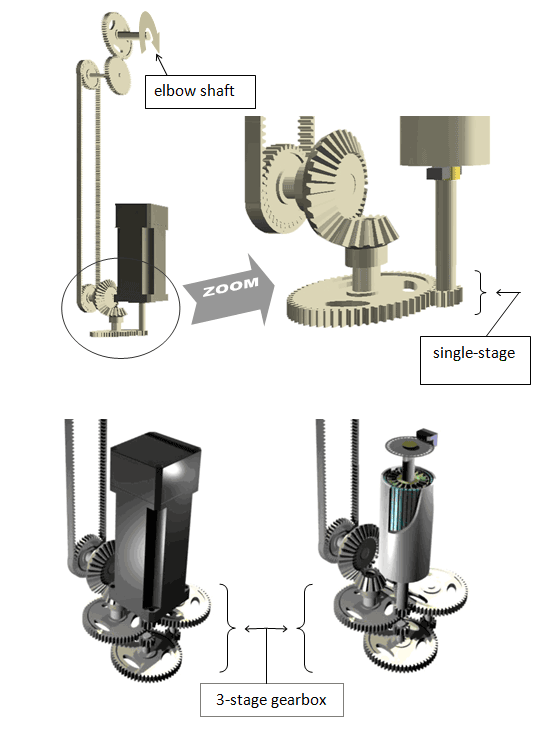
- Inner mechanism – transmission system
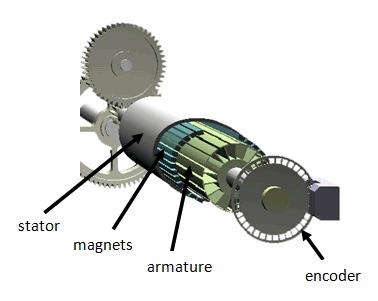
- Motor & Encoder components
Some next steps. As a further development of the virtual; laboratory, we see:
- the wider implementation of social clubbing concepts that will allow for improved/advanced communication between students present in the laboratory at a time, including joint work on an exercise;
- introduction of a supervisor/tutor, starting from a real assistant virtually present in the lab and gradually replacing him with a fully virtual AI-based assistance.


